Published: March 2020 | Last Updated:December 2025
© Copyright 2026, Reddog Consulting Group.

On Amazon, your product photography isn't just a detail—it's your best salesperson, working 24/7. Your images are the first, and often only, opportunity you have to grab a shopper's attention, earn their trust, and convince them to click "Add to Cart."
Simply put, professional, clear, and compelling photos directly increase sales and reduce returns. It's a fundamental principle of eCommerce growth.
On a crowded digital shelf, your product images have to do all the heavy lifting. Shoppers can't touch, feel, or test your product, so your photography must fill that sensory gap. It’s not just about showing what an item looks like; it’s about communicating its quality, features, and value in seconds.
This visual conversation is critical for brand growth. We've seen it time and again: high-quality product photography isn't just a nice-to-have—it's a core driver of performance. According to industry data, at least 75% of online shoppers rely on product photos when making a purchase decision. For more on this, check out these insights on Amazon product photography from SalesDuo.com.
Think of your image gallery as a visual sales pitch. Every photo should answer a potential customer question, often before they even think to ask it.
A complete, well-planned set of images signals professionalism. It tells shoppers you're a serious brand that invests in quality, which directly impacts their decision to buy. Strong visuals are a non-negotiable part of any strategy meant to increase your ecommerce conversion rate because they eliminate doubt and create desire.
Your Amazon images are more than pictures. They are a direct line to your customer, shaping their decision-making process. To drive sales and reduce returns, they must be clear, compelling, and answer key questions.
Ultimately, investing in top-notch product photography is the first step in our Foundation → Optimization → Amplification growth framework. It creates the solid base upon which all other listing optimization and marketing efforts are built. Without a strong visual foundation, even the best SEO or PPC campaigns will underperform. Your images don't just sell a product; they sell your brand's promise of quality and reliability.
High-converting product photography doesn’t happen by accident. It’s the result of a solid plan and the right tools. Before you touch a camera, you need to lay the groundwork. This means defining your equipment needs and, just as importantly, creating a strategic shot list that tells your product's complete story.
Many sellers get stuck here, assuming they need a massive budget. The reality is, you can create powerful, sales-driving images at almost any price point. The goal is to choose gear that fits your budget and skill level while delivering the clarity Amazon shoppers expect.
This entire process, from taking the first picture to earning a customer's trust and closing the sale, creates a direct funnel that fuels your growth.
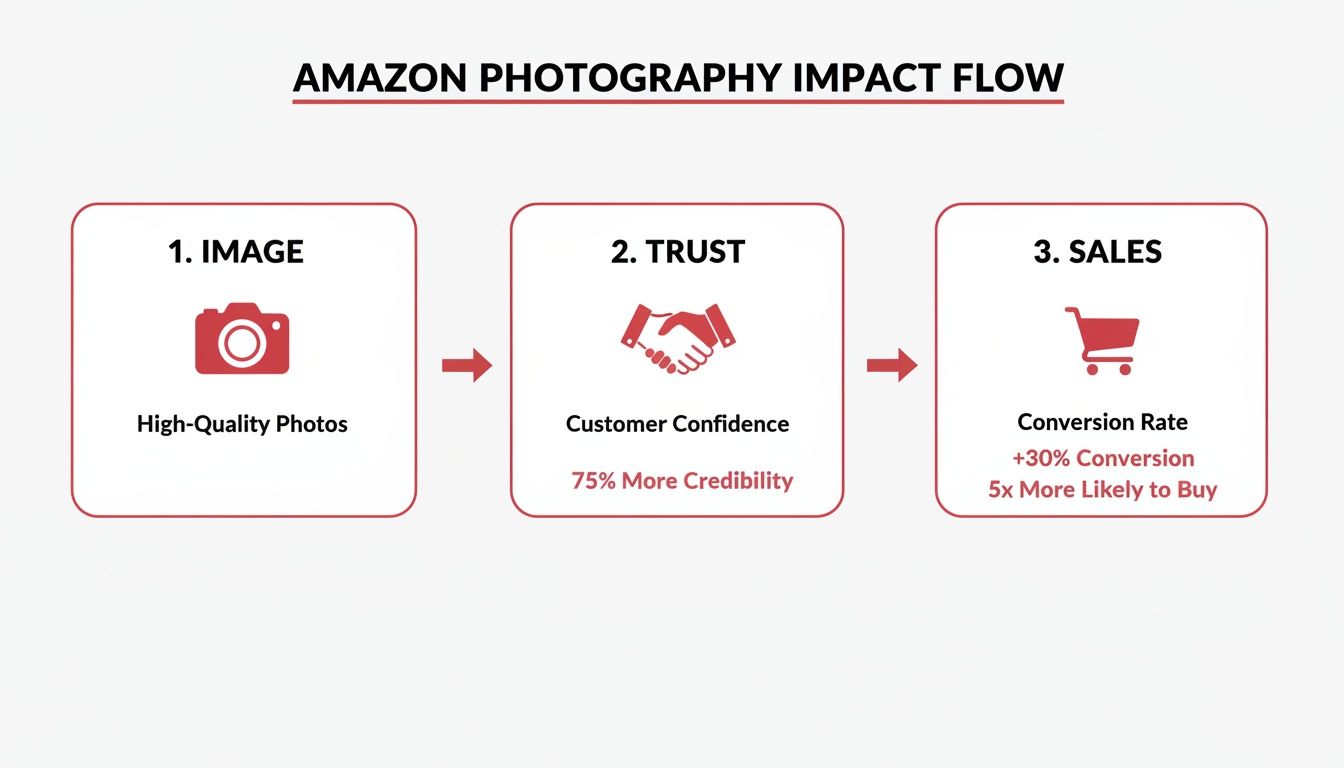
As you can see, photography is the first step in building the customer trust needed to turn browsers into buyers. It's a measurable input for a critical business output: sales.
Let’s be clear: the best camera is often the one you have and know how to use. That said, different tools provide different levels of quality and control, impacting the final result.
Regardless of your choice, a sturdy tripod is non-negotiable. It eliminates camera shake and ensures every photo is perfectly sharp—a must-have for utilizing Amazon’s zoom feature effectively.
Your Amazon listing provides up to nine image slots, and each one needs a purpose. A planned shot list ensures you cover all angles, answer customer questions visually, and build a narrative that sells. Think of it as storyboarding your product’s key value propositions.
Your shot list should go far beyond the main image. You are building a complete visual package that anticipates what a buyer needs to see before they feel confident enough to purchase.
A high-impact shot list should always include:
Planning your shots isn't just about taking pictures; it's about strategically engineering a visual argument for why your product is the best choice. Every image should overcome an objection or highlight a key selling point.
When you map out every image beforehand, you create an efficient workflow and ensure your final gallery is a powerful, cohesive sales tool. This foundational work is what separates listings that get lost in the noise from those that stand out and convert.

With your gear and shot list ready, it's time to bring your products to life. This is where art meets science. The right lighting and staging can transform a simple item into a must-have product, instantly shaping how customers perceive its quality and value.
This is the difference between a photo that just shows a product and one that truly sells it.
The secret isn’t expensive gear; it’s understanding how to control light. Every choice you make, from the type of light you use to the props you select, is a strategic move designed to build customer confidence and drive them toward purchase.
The first concept to grasp in product photography for amazon is the difference between hard and soft light. This fundamental principle defines the mood and clarity of your images.
You can create beautiful soft light without a complex setup. Positioning your product near a large window (out of direct sunlight) provides a great natural light source. For artificial light, a softbox is the go-to tool. It’s a light source with a diffusion panel that mimics gentle window light, giving you consistent, professional results.
Great lighting isn't about brightness; it's about control. By mastering soft, diffused light, you ensure your product is the hero of the shot, free from distracting glares and harsh shadows that can make it look cheap.
You don't need a massive studio to achieve professional-looking photos. With a basic light source (or two), a reflector, and a simple white backdrop, you can build a setup that works for a wide range of products.
A classic, effective setup is a simplified three-point lighting system. Your main light, the key light, is placed at a 45-degree angle to your product. On the opposite side, a white foam board or a reflector bounces light back to fill in shadows. This acts as your fill light.
To take it a step further, add a third light—a backlight or rim light—behind the product. This creates a subtle glow around the edges, separating it from the background and adding a professional sense of depth.
Once your lighting is dialed in, focus on staging. How you present your product can instantly communicate its purpose, scale, and key features. Your styling should always serve a strategic purpose.
For instance, shooting a high-end leather wallet with a classic watch and a fountain pen doesn't just show the wallet; it tells a story about a sophisticated lifestyle, appealing directly to your ideal customer. That emotional connection is a powerful conversion driver.
Here are a few practical, product-specific staging tips:
Every prop and surface should reinforce the product's value. A rustic wooden board works for artisanal food, while a clean marble surface elevates luxury beauty items. Staging isn't just about making things look pretty; it's about building a visual narrative that guides the customer from browsing to buying.
Getting a great shot is a huge milestone, but the work isn’t done. Now comes post-production—the crucial step where you transform raw photos into polished, high-converting assets that meet all of Amazon's technical requirements.
This isn’t just about aesthetics. It's about technical precision that has a measurable impact on sales. Every edit, from background cleanup to file compression, affects how quickly your page loads and how shoppers (and Amazon’s algorithm) perceive your product.
A structured post-production workflow saves time and guarantees every image you upload is optimized to perform. It begins with selecting your best shots and ends with smart file management.
First, "cull" your photos by selecting only the sharpest, most compelling images from your shoot. Once you have your final selections, your workflow should include these essential steps:
This level of detail is what separates professional sellers from amateurs. It builds a subtle layer of trust with customers, reinforcing the quality of your brand.
Amazon has specific image requirements for a reason: they create a consistent, high-quality experience for shoppers. Meeting these technical specs is critical for your listing's visibility and performance.
The key challenge is balancing image quality with file size. You need high-resolution images for the zoom feature, but large files slow down your page load speed—a known factor that can hurt your search ranking.
Think of image optimization as a negotiation between quality and speed. You need enough resolution for customers to zoom in and inspect details, but the file must be small enough to load almost instantly. A slow-loading image is often no better than a bad image.
To push your images from good to great, it’s worth exploring advanced conversion optimization strategies. These tactics work with your visuals to create a powerful, sales-driven listing.
Deciding between shooting in-house or hiring a professional often comes down to budget and expected return. Here’s a data-informed breakdown to guide your decision.
| Factor | DIY Approach | Professional Service |
|---|---|---|
| Upfront Cost | $500 - $2,000+ (camera, lighting, software) | $1,000 - $5,000+ (per project/package) |
| Time Investment | High: Learning, setup, shooting, editing | Low: Briefing, feedback, and approval |
| Skill Level | Beginner to Intermediate | Expert |
| Image Quality | Good to Great (with practice) | Consistently High-End & Polished |
| Potential ROI | Slower initial ROI, improves with skill | Faster ROI due to higher conversion rates |
| Best For | New sellers, tight budgets, simple products | Established brands, complex products, high competition |
While the DIY route has a lower upfront cost, the time investment is significant. Professional services deliver conversion-ready assets faster, often leading to a quicker and higher return on investment through increased sales.
Preparing your files for upload is the final—and often overlooked—step. These details matter.
IMG_8472.jpg, name it blue-stainless-steel-water-bottle-main.jpg. This provides a small but valuable SEO signal to Amazon.This entire process, from retouching to the final save, feeds directly into your broader Amazon goals. Data shows that listings with professional photos can see up to a 30% lift in conversions. When combined with other on-page tactics, these optimized images become a core part of your Amazon listing optimization strategy, helping you climb the rankings and drive more sales.

You've built a solid visual foundation and optimized the technical details. Now it's time to amplify those assets. This is where you move beyond the main image gallery and transform your product detail page into an immersive brand experience using lifestyle shots and A+ Content.
This stage is about connecting with customers on an emotional level. While your main images on a white background show what your product is, lifestyle shots show why a customer needs it. They bridge the gap between seeing a product and imagining it in their own life.
Lifestyle photography is your most effective storytelling tool. It places your product in a real-world context, helping shoppers see themselves using it and experiencing its benefits. Consider this: a yoga mat on a white background provides information. A photo of someone using that same mat during a sunrise yoga session sells a feeling of peace and wellness.
This is no longer a "nice-to-have." In today's crowded Amazon marketplace, where 65% of consumers are visual learners, image-rich listings capture far more attention than text-heavy ones. Lifestyle photography has become essential for building a connection that drives sales.
Here’s how to make your lifestyle shots deliver measurable results:
A+ Content is where your entire visual strategy comes together, creating a powerful, branded story below the fold. It allows you to combine your best lifestyle photos, infographics, and sharp copy into a rich, magazine-style layout. This is your chance to go beyond bullet points and truly tell your brand’s story.
You’re no longer just creating a product listing; you're building a mini-website on your Amazon page. That’s a massive advantage for cementing your brand identity and educating shoppers. For more on creating a consistent presence, see our guide on adhering to Amazon brand guidelines.
A+ Content is the ultimate expression of our Foundation → Optimization → Amplification model. It takes your foundational images and optimized text and amplifies them into a cohesive brand story that boosts conversions and builds lasting customer loyalty.
A well-designed A+ Content section can increase conversion rates by as much as 10%. It achieves this by answering deeper questions, overcoming objections, and building a level of trust that a standard listing simply cannot match.
The key to effective A+ Content is using the modules strategically. Don't just place random images on the page. Build a narrative flow that guides the customer through your story.
Here's a winning A+ Content structure we've seen deliver results:
Don't forget video. Incorporating strategies for creating product videos that convert within your A+ Content or main gallery gives shoppers a complete visual experience. This omnichannel approach turns your listing into a powerful sales tool that ensures your brand message is consistent and impactful, whether a customer finds you on Amazon or your own DTC site.
Even with a clear plan, navigating product photography for Amazon can raise questions. Getting straight answers is the best way to move forward and create images that generate revenue.
Let’s address some of the most common questions sellers ask. Think of this as a final check-in before you start shooting or hire a professional. Getting these details right is often what separates a frustrating photoshoot from a successful one.
Amazon offers nine slots, but the goal is quality over quantity. Aim for 5-7 high-impact images that tell your product's complete story.
Your core image set should cover these bases:
If your product is complex, use the extra slots to break down more features. But remember: five excellent photos will always outperform nine mediocre ones.
Yes, absolutely—but with a major condition. Modern smartphone cameras are incredibly capable, but a great photo depends more on your setup than the device itself. A picture from the newest iPhone in a poorly lit room will look terrible compared to one from an older phone with excellent lighting.
If you use a smartphone, you must control your environment. This means using a tripod for sharpness, finding bright and soft light (like a large window on an overcast day), and using a clean background. Post-production is also non-negotiable. You will need editing apps to correct colors, crop appropriately, and ensure your main image background is pure white.
A smartphone is a capable tool, but it's not a shortcut. The core principles—good lighting, a stable setup, and thoughtful editing—are even more critical when you're not using a professional DSLR.
Most sellers encounter the same preventable hurdles. Knowing them in advance gives you a significant advantage.
One of the most common mistakes is inconsistent lighting. When photos in a single listing have different color tones or brightness levels, it looks amateurish and unprofessional. Another major error is a "busy" background in lifestyle shots. If the clutter behind the product draws the eye, you’ve lost the sale. The product must always be the hero.
Finally, ignoring Amazon's technical requirements is a critical error. Uploading images that are too small for the zoom feature or failing to use a pure white background for your main image can get your listing suppressed. These aren't just suggestions—they are rules that directly impact whether customers can find and buy your product.
Ready to stop guessing and start growing? The team at RedDog Group uses a data-driven approach to turn your product listings into high-converting sales assets. Let's Talk Growth.
Leave a comment: